Curious about who I am? Posts about health and natural birth Resources and posts regarding vaccines and informed consent Posts about Parenting and Relationships Spirituality and Life Lessons Email me Home
Showing posts with label homemade. Show all posts

Homemade Shampoo

The two essential ingredients in this recipe are the Bronners soap and water – you can essentially add anything you want after that and personalize it to your specific needs. This is what I use:


Ingredients:

1 Cup             Bronners Soap (baby mild)
1 Cup             Water
1/4 Cup         Aloe Vera Gel
2 Tbsp             Vegtable Glycerin
1 Tbsp             Extra Virgin Olive Oil
1 Squirt           Honey
5-10 drops     Vitamin E

Optional: Various Essential Oils (I like Mango-Peach, Rosemary, Thyme and Peppermint)

For Conditioner: 1 Spray Bottle filled with Apple Cider Vinegar


Why These Ingredients?


Dr. Bronners Soap (Baby Mild)- this soap comes in different fragrances such as peppermint and lavendar, but I choose the baby mild because it’s better for people with sensitive skin and allergies. (Plus I can add my own essential oils to it to make it my very own.) All t he oils and essentials in this soap is certified organic. You can learn more or order this here.


Aloe Vera Gel- I choose to add aloe vera gel because the soap and water by itself can be very drying to the hair shaft and scalp. Aloe vera gel has many benefits to hair; it moisturizes, soothes irritation, and it has restorative benefits.

I ordered mine from Lily of the Desert - just make sure you are getting 100% Aloe Vera gel (many over the counter brands have filler ingredients)


Vegtable Glycerin- Known to be a humectant (meaning that it attracts water), veggie glycerin helps add moisture as well. (You can skip this ingredient if you wish) While using this as a body wash, it is also nice to know that glycerin helps skin cells mature properly and has been known for its healing properties (because it helps tissues and cells repair themselves).


Extra Virgin Olive Oil- I’ve used this as an intense conditioner treatment in the past and it’s amazing. I added a tbsp of this to the mixture because it can improve the strength and elasticity of the hair. It can penetrate the hair shaft and supply moisture to the cortex of the hair. EVOO contains antioxidants such as vitamin E and A.

EVOO is great for severely dry skin - apply oil directly to skin after washing in the shower or tub and you'll reap the intense moisturizing benefits (safe for kids too).


Honey- This is a humectant as well, but honey smoothes the cuticle so the hair feels soft and looks shiny. (plus you most likely have this on hand)


Vitamin E- although EVOO contains vitamin E, I added a few more drops. Vitamin E is wonderful for hair and skin. It protects the cells from free radicals, helps with split ends and keeps color vibrant. From what else Ive read, it can also help your hair from going gray – so maybe use 10 drops instead of 5 if you are over 30 like me.


Essential Oils- these oils promote natural shine and a healthier scalp, especially when used at night to allow several hours for your hair to absorb them. Make sure you purchase 100% pure essential oils. For this first batch, I used rosemary and thyme. Peppermint is also a great choice.


My Experience with Homemade Shampoo


So now that you know why I used the items I did – let me tell you how it worked.

I was a bit leery since I had heard reviews that the Dr Bronners soap can be quite drying, but since I added quite a bit of moisturizing ingredients, I was hopeful.

I was surprised by a few things:


1. It lathered up much more then I expected.

2. It was more liquidy then I was used to. 

3. When I used it on my face to wash my make-up off, it worked better then the stuff I had been using for over 5 years; especially with my mascara!

4. My hair seemed a lot thicker then normal and the texture seemed more substantial-I’m not sure of the wording here, but I guess heartier word be the way to describe the texture.


The first night I did not use the apple cider vinegar spray as a conditioner. I regret this….Instead, I used some coconut oil on the ends and it made my hair very greasy!

The next night I washed my hair again, which is not my normal routine – I normally wash my hair every 3 to 4 days, but since I put that coconut oil in my hair, I had to wash it out because I felt like a grease-ball.

This time I used the apple cider vinegar as a conditioner. One word - amazing!

Using the ACV you are able to restore the PH balance in your hair which is critical. The benefits of ACV is the great ability in adjusting the acid alkaline balance because of its calcium and potassium mineral content. Though I was hesitant on using this as a conditioner, I have truly converted into a apple cider vinegar lover!


Conclusion


My hair hasn’t looked or felt this healthy in years! (and it has only been 2 weeks!!) I would suggest trying on making your own shampoo or at least consider a more natural shampoo.

This shampoo wash can replace your body wash and face wash. I use this on my daughters as well and find it very reassuring that I know exactly what the ingredients are and why they are being used.

Natural Teeth Whitening with Activated Charcoal

Teeth whitening is big bussiness. From professional whitening sessons to whitening strips to gum that even claims to whiten - everyone wants that brillant, dazzling smile.


The most popular whitening strategy is to use hydrogen peroxide. Dentist use hydrogen peroxide as a bleching agent which uses acid to bleach the germs on the surface of the teeth that cause discoloration.


The downside to using hydrogen peroxide is mainly due to the fact that it is an acid. It can cause your teeth and gums to be overly sensitive. You may even see your gums swollen or inflamed after whitening. It also has the potential to actually increase the porosity of your teeth.


Activated Carbon


Activated carbon is best known as an emergency decontaminant in the GI tract - laymens terms: it's given to people who overdose on drugs or chemicals. This is because of its adsorption (yes, adsorption not absorption) ability.


Briefly - to understand why activated carbon is AWESOME, let's learn some science.


Surface Area and Adsorption


Activated charcoal is most commonly made from coconut shells. When charcoal is termed "activated" it means that it has been produced to have a very fine particle size - which increases the overall surface area.


an electron microscope image of activated charcoal


One standard 50-gram dose of activated charcoal has the surface area of TEN football fields.


This is significant when dealing with adsorption - this is because adsorption is different from absorption in the sense that it focuses on the surface area NOT volume.


A good analogy is someone drinking a glass of water. When you drink the water you are technically absorbing the fuild and making it a part of you. Adsorption happens when you get clumsy and spill the water all over your shirt. The water does not become you but instead it just bonded physically to your surface (your shirt).


Activated Charcoal and Teeth Whitening


Activated charcoal is amazing at whitening teeth because of its adsorption qualities - specifically of tannins. Tannins are in the food and beverages we consume that stain our teeth (wine, tea,cola, sauces, sweets,etc) and activated charcoal is remarkably efficient and fast at adsorbing them.


It even has the ability to be helpful at adjusting the pH balance in the mouth - which is effective at preventing cavities and bad breath.


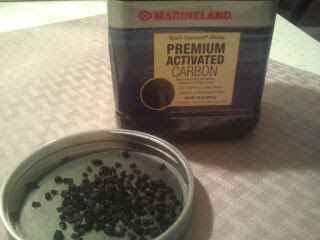
I purchased my activated carbon through Amazon. Don't make the same mistake as me - make sure it's already in it's powder form. (I bought mine in crystal form and had to pulverize it –bah.)


This is a picture BEFORE pulverizing into a powder - to
skip this step simply buy in powder form.


Here is how I use activated charcoal in whitening and maintaining a brillant smile:


1.   Clean/Brush teeth


2.   Add a bit of the activated charcoal powder in a small cup. Add some water to create a sort of ‘slush’ mixture.  


3.      Move the water to the front of your mouth and let it set there for a minute or so.


( You can also dip a clean toothbrush into powder and very gently rub onto teeth – I’ve done this as well, but you must be very careful not to let the charcoal be abrasive to your teeth or gums)


4. Let sit on teeth (I usually let it set for about 1 minute)


5. Rinse well – you most likely need to brush your teeth again because the black charcoal gets in between the teeth and it can be difficult to simply wash out with just water)


Afterwards your teeth will feel very smooth and clean - plus they will look brillant. At first, I used this regime everday for a week. The above pic was taken after only a few times of using - I plan to update the picture after using for a few months. Currently for maintenance, I use about twice a week.

Vegan Green Bean Casserole

Every year for Thanksgiving, I make green bean casserole. 

This year, however, I had to tweek my recipe a bit – making it completely from scratch.


It turned out absolutely delicious! All my family members raved how great it was (with none of them the wiser it was completely vegan!).

Even if you are not vegan – I urge you to try this next time you think about making green bean casserole!  Enjoy –


Ingredients

4 cups chopped mushrooms
2 tb chopped onions
2 small cloves of garlic
3-4tb vegan friendly butter
2tb corn starch
2 ½ c soy or almond milk
4cans of green beans (you could use frozen or better yet fresh!)
2 containers of French fried onions
salt and pepper


Pre heat oven to 350.
Chop up mushrooms – I used baby portabellas for this recipe.


Chop up onions and garlic


Melt butter


Saute mushrooms, garlic, onions – add some pepper as well (skip the salt here for now because it will make the mushrooms wacky)


Add 2 cups of soy or almond milk (I used organic soy in my recipe) to the sauté mix and bring to a boil.


While that is heating up mix ½ cup of milk and your corn starch – whisk together with fork and make sure it is well incorporated.


Add the cornstarch mixture and reduce to a simmer – uncovered

While that is simmering (stir occasionally) – drain/clean green beans.


Add greenbeans to a nice container and mix with French fried onions. Once you approve of the consitency of the mix/mushroom mixture – pour over green beans – add salt and pepper – mix together well.

Bake for about 20-25 minutes
Stir again and add remaining French onions to top – back for about 6 more minutes.

Remove from oven and enjoy!


4 Natural Remedies For Colds in Kids

Although prevention is ideal, it is inevitable that at some point in early parenthood you will be faced in dealing with the common cold.

Over-the-counter medication may bring symptom relief, but by using a natural approach you are able to tackle the root of the illness. Some remedies even boost the immune system.

Here is what I employ when my daughters happen to catch one of the hundreds of viruses that cause the common cold.

Start with a Warm Bath

Don’t underestimate a warm, soothing bath.

For me, I take a steamy shower when I’m sick – but I can’t exactly put my 3 yr old in a hot cascade of water.

Warm bathes have the ability to moisturize the nasal passages and relax a child. This is an easy and valuable way to sooth and reduce the aches of a cold.

Take this time to sing a soft song and give a mini massage too!


Try a Honey Beverage

Warm liquids relieve nasal congestion and helps prevent dehydration, couple that with the benefits of honey and you have a winning combination.

Research published in 2007 in the Archives of Pediatrics states that honey is a ‘preferable treatment for cough and sleep difficulty associated with childhood upper respiratory-tract infections’.

There were also significant differences in symptom improvement in those children that were treated with honey – “with honey consistently scoring the best”.  

Honey is believed to have antioxidant and antibacterial effects. Choose the dark-colored honey (buckwheat honey) which is the highest in antioxidants.

How to: We start with really warm water, placing a few tablespoons of honey in the cup. Stir rapidly to incorporate the honey. The end product is a sweet treat to enjoy after a warm bath.

Cozy up in bed and enjoy while reading their favorite book.


Use a Homemade Vicks Rub

Vicks VapoRub is a popular over-the-counter choice implemented by parents. However, research published in 2009 brings up reservations when using this medicine – specifically, it can dangerously interfere with the ability for young children to breathe.

Although the label directs parents not use on children under the age of 2, the researchers in the study noted that many parents ignore such labeling advice.

A good alternative is to make your own, safe and natural, Vicks Rub!  

Pour some type of carrier oil (olive, almond, etc.) in a small bowl or cup. Then add a few drops of eucalyptus oil (I also add some rosemary and white thyme).  (Mary Bove, N.D. An Encyclopedia of Natural Healing for Children and Infants pg 286)

Use a cotton swab to soak up some of the mixture and apply.

I always put a liberal amount on the soles of my children’s feet and cover with socks during the night. I do not apply to the chest…check out the next remedy…  

(If you are not familiar with using essential oils, please note – do not apply undiluted oils directly to the skin or ingest them. I purchase my oils from Mountain Rose Herbs.)


Humidifier with Eucalyptus Oil

This is my all time favorite natural remedy!

Here is a fun fact – Cineole is the active component in the eucalyptus oil that is responsible for its potent aroma.

When you inhale eucalyptus, cineole acts as an anti-inflammatory agent and an expectorant. This will help remove mucus and loosen anything funky going on inside in a gentle manner.

However, undiluted or pure eucalyptus oil can provoke headaches when directly inhaled – this is why I feel it best to add the oil to my humidifier in small amounts – inhaled over period of time.

It is super easy and convenient. Make sure your humidifier is clean – add water and a few (@10) drops of eucalyptus oil (I also add rosemary and occasionally white thyme or peppermint oil).

Try this remedy and I’m sure you’ll love it!  

Homemade Laundry Detergent

After becoming a bit more comfortable with making homemade products, I thought I would I try my hand at detergent.


I spend a good deal of money on both cloth diaper friendly detergent and the most ‘natural’ regular detergent for my family’s clothes.

Both of these recipes are super easy and the ingredients you can get at your local grocery store. Both are great for HE machines as well since they are low suds-ing. (We currently use this detergent on our front-loading HE machine)


Let’s start with the easy one: cloth diaper detergent

Ingredients:

(Equal Parts)

Arm N Hammer Super Washing Soda
Baking Soda
Sun Oxygen Cleaner

I always enjoy understanding why I am using a certain product – so here is a quick explanation to why these ingredients are a good choice to use when washing clothes/diapers.


Washing Soda – (Sodium Carbonate – Na2CO3) Washing Soda is very caustic with a PH of 11 which is great in degreasing, removing stains and cleaning. It is also great at softening water due to the two sodium molecules in the formula.  

Baking Soda – (Sodium Bicarbonate NaHCO3)  Baking soda has a PH that is slightly base compared to washing soda and dissolves faster as well. It is a great product to get rid of funky odors and neutralize acids, like urine (hello, cloth diapers!).

Sun Oxygen Cleaner – NOT OXYCLEAN! The versions of OxiClean contain too many additives. Instead, use simple oxi-products like Sun Oxygen Cleaner. When the hydrogen peroxide (the main ingredient in oxygen cleaners) meets water, it breaks down into oxygen and water which forms little bubbles like soda - which gently bleaches and cleans.  


So here it goes – just add all of the ingredients in a bowl and mix well with a wooden a spoon. Viola! How frigg’n easy is that!? I use about 2-3 tablespoons per load for my HE washer.


Place in an air tight container and rock-n-roll. For a scoop, I bought a small metal cup (I believe it is used for measuring alcohol in mixed drinks). I use a whole little cup full - I believe its about 3 tablespoons.


Now that you’ve mastered that. Here is a bit more challenging recipe for an all-purpose detergent.


Ingredients:

1 cup  Arm N Hammer Super Washing Soda
½ cup Sun Oxygen Cleaner
1 bar   Fels-Naptha Soap


I got my Fels Naptha Soap at Walmart. I was surprised at how fragrant it was – it smelled very clean and refreshing.


I made a double batch here, so I cut up two bars.


After getting permission to use my husband’s food processor, I placed the soap chucks in the processor to shred up. You could grate by hand if you don’t have one handy and have a ton of time on your hands. (It was actually pretty easy to clean afterwards)


I placed the rest of my ingredients in the processor.


And then run the thing for a good while until everything is mixed well and the soap is pulverized. Place in a container that has an air tight lid – and that’s it! I use the same amount - about 2-3 tablespoons for each load.


Well, then you have to do dishes – bah.


So, 4 ingredients and you have two detergents that are guaranteed to save you money and clean just as well, if not better, then the detergent you buy at the store (most of which contain surfactants, dyes, optical brighteners, and enzymes).  


You may notice that I omitted a very commonly used item in homemade detergent: Borax – this is done purposefully. Due to studies linking this chemical to reproductive problems, many European nations require the box be labeled with warning such as “may damage fertility” and “may damage unborn child”.

I decided to use an oxygen cleaner in place of Borax. This is because when using Borax and Washing Soda, the two combine and form molecules of hydrogen peroxide which is the main ingredient in oxygen cleaners. So, in essence, I am just skipping a step and adding the H2O2 molecules instead of the nasty chemical compound, sodium borate (Borax).


Looking for other homemade recipes? Check out some others that I have tried:


9 Practical Reasons for Babywearing

I’m a virgo and I’m all about practicality. I consider my slings, wraps and carriers one of my most useful and economical possessions. Here is a no-nonsense list of why I like to “wear” my babe.


No cost weight training

Wearing my baby in a sling burns more calories which results in a guilt-free slice of chocolate cake after dinner.


Contributes to my helicopter patenting style

Instead of running loose in crowded or dangerous places, a child in a sling is held safe and secure right next to your body which results in less panic attacks worrying your child might somehow run free in the parking lot.


I’m cheap

I made a sling once out of an old tan bed sheet. Have you looked at the prices of strollers or “carrying” systems lately?!

You can mostly often find used slings, wraps or carriers at consignment stores too…which also means you can sell your slings/wraps when you are all done with them, woo who!


Blame it on the baby

If you fart, burb or make some other odd bodily noise, its much easier to blame it on the baby when you are carrying them in a sling. More bean dip anyone?


Hello Convenience

Not having to worry about negotiating steps, crowds or narrow aisles with a stroller is nice. I can take the most direct route to wherever I want to go without mapping out a route first. Also, people tend to move out of your way more quickly when you are heading at them in a hurry with a baby.


Quick way to “wear” them out

Babies who are carried in a sling are sure to have a busier view than babies who just lie around. A Saturday morning at the market carrying Charlotte around always leads to long and restful nap for both parties involved.


I can wear a sports bra all day

This is reason enough to go out and buy a sling. Since my top is mostly covered up when I am babywearing, I could care less if my boobs look like two flat pancakes.


I can make friends too (while wearing a sports bra)

When you use a sling or a carrier it gives you a free pass to talk to other babywearers. You are also permitted to employ the secret hand wave(s), notoriously implemented by motorcycle drivers.


The Two-finger Flip- Here, the initiator is sending a clear signal that he acknowledges you.


The Dis- Dating back to the days when rival motorcycle gangs roamed the streets


The Geek- reserved for the new riders


I always win the “My ‘purse’ is more expensive then yours” game

It’s fun to see a single person carrying around a $400 coach purse when I am carrying something that cost approximately a quarter of a million dollars to raise – nevermind if my shoes are 15 years old and I have an old ketchup stain on my jeans. (click here to find out how much it will cost you to raise your baby)


It Creates a Toddler-Babywearer

Seeing my toddler baby-wear her Barbie on a walk around the block is one of the sweetest things to witness – next to seeing her breastfeed a mermaid and put a cloth diaper on a tiger.